
Wednesday, August 4, 2010
Challenge cuff completed, although future design alterations are in the works
Shaping the challenge cuff

Framing up a cuff
Okay, diagram and focal in hand, I began to frame up the cuff for my challenge today.
The cuff was inspired by Alexander Damian, who used carnelian and copper, a favorite combination of mine. My friend April has been having fun with shrink plastic, bringing back my love for it, so I decided to do one of my miniature colored pencil paintings on shrink plastic as the focal for my cuff design.
Dawn and Penny, who originally started this challenge, have long since finished their cuffs, with me lagging far behind due to the lack of supplies to finish my original design. Time to play catch up!
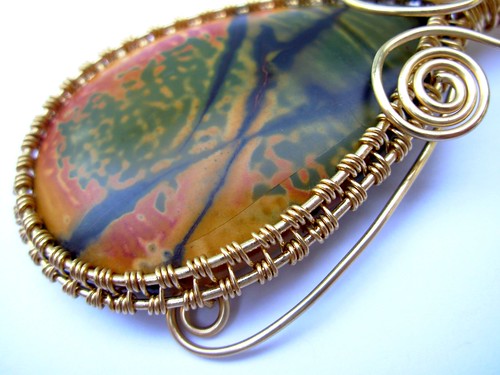
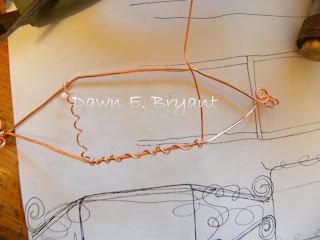 I wanted the cuff to center around the autumn themed focal painting and appear "tendrilly," so I hammered (for strength) 16g copper wire after forming it around the top and bottom of the focal. Then I wrapped 20g copper around it loosely to resemble tendrils.
Now the hard part was to figure out how to hold the focal in the cuff! Next post!
The cuff was inspired by Alexander Damian, who used carnelian and copper, a favorite combination of mine. My friend April has been having fun with shrink plastic, bringing back my love for it, so I decided to do one of my miniature colored pencil paintings on shrink plastic as the focal for my cuff design.
Dawn and Penny, who originally started this challenge, have long since finished their cuffs, with me lagging far behind due to the lack of supplies to finish my original design. Time to play catch up!

Now the hard part was to figure out how to hold the focal in the cuff! Next post!
Cuff Challenge -- a whole new idea -- Alexander and April inspired


I have gotten back into my miniature colored pencil paintings on shrink plastic again, so I have been tearing boxes apart at our new house trying to find the box with the computer discs full of my photos.
I wanted something with warm fall colors in it, and sadly, had lost most of those photos with a computer meltdown a few years back, but I did finally find a suitable photograph. I won a few awards with this photo a few years back, but it has been out of mind since.
So, I did a small painting, baked it to shrink it, then baked it again to soften the edges, intensify the colors and seal the back, plus add shine.
Then I sketched out the bracelet design. I wanted it to incorporate the focal, plus be "tendrilly."
This is the design I came up with, and the focal piece.
Monday, July 26, 2010
It's done day or should I say week three or four


Added some sterling silver beads, more wire, crystal pale pink heart, silver heart, that I banged out of 20 gauge wire. Pulling, twisting to get into shape. Big challenge, huge challenge, loads of mistakes but here it is. I am going to call it My Friendship Bracelet; why, because this bracelet has played a very large part in finding and enjoy a kindred sole.
Saturday, July 24, 2010
Play time!

Tuesday, July 20, 2010
Alexander inspired cuff finished, and nothing like its inspiration!
 Thanks for visiting!-Dawn Blair
Monday, July 19, 2010
The cinched cuff that Penny inspired me to make is finished! YAY!
 Well, this turned out to be a gem of an idea, and didn't take too terribly long to make. Despite the fact that my measurements (or lack thereof) were not concise and the middle was bulky, the bracelet turned out pretty good. I like it well enough that I'll be making earrings to match and will add it to my wardrobe! To add the cluster of beads, I twisted 24 gauge wires onto the stray coiled pieces left over from binding the cuff in the middle. Then I added beads and tightened them down by simply coiling the end up to the bead, It only took ten or twelve beads, I'd say.
Thanks for the inspiration, Penny!
Cheers! -Dawn Blair
day 3


I have sent the cuff with the pinched to centre to watch over my junk pot and have resurrected my first attempt. I promise I will not switch back ( unless some unforeseen damage should occur to this cuff) Oh! like a house falling on it. I have used 14 gauge copper hammer the front. I had to get rid of the heart shaped closure because the cuff was huge for my wrist. The little thing that is there now is so badley mangled I don't know what I will do right now, hopefully something will come. The side has been filled in with 26 gauge silver (not real, it came from a craft store) hammered and made into swirls , little silver balls and very small clear Swar. Crystal. In these pics they have just been set in the frame in rough. I will put them in with copper wire tomorrow night
Penny
Hammered bronze and sterling cuff -- day 1 -- Dawn E. Bryant

Dawn E. Bryant
Sunday, July 18, 2010
Inspired by Penny's cuff shape...
After looking at Penny's cuff shape, I decided I wanted to try a cuff that was cinched in the middle. I think the shape has a multitude of possibilities. I wanted to do all copper, like Penny's, but I couldn't find my coil of 16 gauge. So I went with brown. After working on all that weaving on the bright colored cuff, I decided to just do a simple loose wrap around one wire this time. The wire was extra stiff, so I felt like it would still be a good support. Unfortunately, I didn't do very well getting the sides to be the same length. And then I got carried away winding wire around the middle, creating unnecessary bulk. But I've decided to go ahead with it, since this is a learning opportunity. I decided since the colors are sort of tree-like, I would shape each side like a leaf. For some reason, I found shaping this into a fitted cuff more difficult than the first one. I'm not sure why. It could be because the diagonal lines were fooling my eye...


Friday, July 16, 2010
1 day later and this is what I have

Penny
Making progress...
So, as I said before, I did the weaving on the frame too tight, so I can't lace anything into it. My first idea for the "filler" in this bracelet was to coil wire adding a bead every inch or so, and then shape it into a free form design.
 Well, after spending two hours on it, I realized that the 20 gauge wire I was using, even with a layer of 26 gauge wire coiled on it, was just going to be too flimsy. I would have to lasso it on, compromising my vision of not covering any of the weaving. So, I pitched that idea.
 Then yesterday, while I was at work I came up with an idea that, while quite labor intensive, is hopefully going to be the solution to the problem. Yes, it worked! If I lace all these loops together I will have something stiff enough that I can just attach it on either end. Adding the crystal helped stiffen the strip and also set the loops so they couldn't be stretched out of shape. Good thinkin'!
  Yay! Another problem solved. The loops arent quite all exactly the same size or perfectly spaced, but I have a feeling this will work anyway.
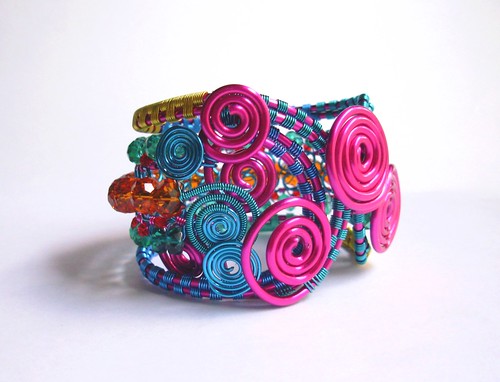
 Yippee! I intend to attach this loop to the plain end of the frame, and attach the two loose ends into the big fushia spirals somehow. Full speed ahead! Cheers! -Dawn Blair
 Then yesterday, while I was at work I came up with an idea that, while quite labor intensive, is hopefully going to be the solution to the problem. Yes, it worked! If I lace all these loops together I will have something stiff enough that I can just attach it on either end. Adding the crystal helped stiffen the strip and also set the loops so they couldn't be stretched out of shape. Good thinkin'! Yay! Another problem solved. The loops arent quite all exactly the same size or perfectly spaced, but I have a feeling this will work anyway.
4 attempts at the cuff


1. First upper left, I made it out of 14 gauge copper , formed it and then whacked it with the hammer.
2. Upper right is a better shot BUT what I am really trying to show you is how wonky it is; this now resides in the junk heap or some other day , some other challenge
.
3. Tools, nylon pliers, 14 gauge copper could not tell you if it is soft , hard ....all I know is it is round, cutters and a ring mandrel to shape the hole.
4. Lower left corner Artistic chocloate brown wire 18 gauge a picture of the internet ( don't remember where) but not my design. But had it have worked it would have been incredible and the inside would have been done similar to the cuff in our challenge. yeah you guessed it..now resides in the J_nk He_p.
5. Lower right, yes sad to say Yes this is the one I have picked. I have an idea if it works be prepared to be amazed, if it doesn't , then its the junk heap for this one too.
6. I sure hope my friends have patients, this could take awhile........
Penny
Thursday, July 15, 2010
....and we're off!
It all starts with the supplies!
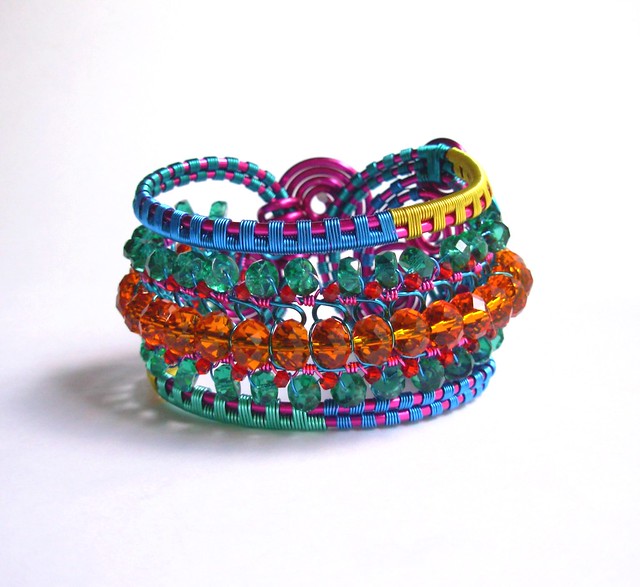
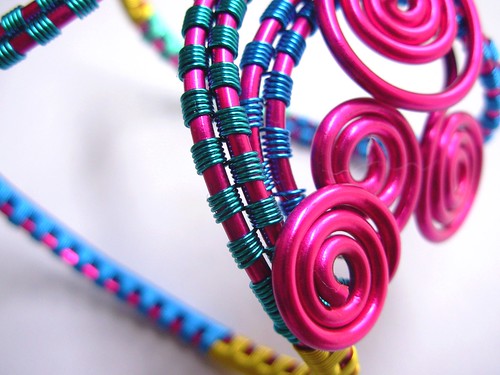
 I am making many modifications to Alexander's bracelet, while keeping with the same basic idea. I have chosen to work with lots of bright colors, and a thicker gauge of wire for my frame. I think the thicker wire will prove easier, because it is stiffer and will be less likely to bend out of shape. The contrasting wires I'll use to do the woven frame will allow me to see my work better.
 I have decided to do several different weaves on the frame with several different colors. I also deviated from Alexander's vision by rounding the ends of the cuff. With the base wire being so thick, getting a nice square corner was near impossible, since I had already completed the weaving before shaping.
Shaping was a challenge because I don't have a bracelet mandrel to work with. So, I did the best I could using my arm.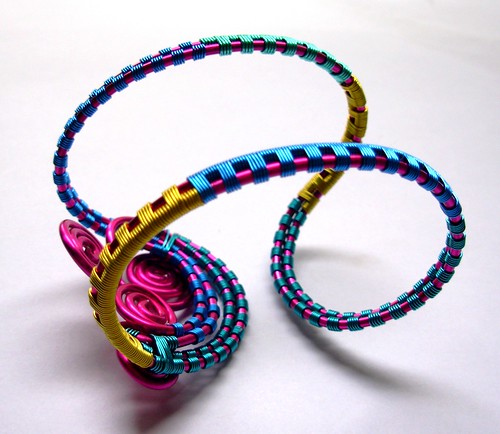 One thing I realized after I completed the frame, was that I failed to leave enough space between the two wires to be able to "sew" in the meandering design that is supposed to fill in that frame.

 I am not willing to cover the woven frame with more wire. That would make the design look untidy. So, until I come up with a bright idea to fit within my own design requirements..... Let's see what the other girls have done! -Dawn Blair
I have decided to do several different weaves on the frame with several different colors. I also deviated from Alexander's vision by rounding the ends of the cuff. With the base wire being so thick, getting a nice square corner was near impossible, since I had already completed the weaving before shaping. Shaping was a challenge because I don't have a bracelet mandrel to work with. So, I did the best I could using my arm.
One thing I realized after I completed the frame, was that I failed to leave enough space between the two wires to be able to "sew" in the meandering design that is supposed to fill in that frame.Tuesday, July 13, 2010
Introductions
Hi! I'm Dawn Blair, of Dawn Blair Jewelry. I am a self taught jewelry designer, but enjoy friendships and creative encouragement with my friends on Jewelry Lessons. I am only one of several designers that will be contributing to this blog. We are are designers from beginner to advanced, sharing our thoughts, questions, designs, and processes with each other, and anyone who happens to stop by. Enjoy! -Dawn Blair


Dragonfly- by Penny
Hello, my name is Penny Mills I am the last member of this trio and the least experienced. So you probably will want to take advice and helpful hints from the other two. I will be the expert on what not to do. I live in the country just outside of St. Marys (population 7,000), Ontario, Canada. Boy!! Is it hot here, really hot!
Hello, my name is Penny Mills I am the last member of this trio and the least experienced. So you probably will want to take advice and helpful hints from the other two. I will be the expert on what not to do. I live in the country just outside of St. Marys (population 7,000), Ontario, Canada. Boy!! Is it hot here, really hot!
The reason for the three of us getting together is very simple one. We love to make jewelry. I had never made a cuff, didn’t have a clue how to. I noticed Dawn Blair had said she never had made one either. Then, Dawn Bryant said she would like in on this too. So the Great Cuff Challenge was born. This design, by Alexander Damian, is our inspiration piece. He graciously gave us permission to publish this photo, and has urged us on in this challenge!

You can take a tutorial and have two people work on it separately, and I can almost guarantee you will end up with two completely different looking items. You will be able to draw some comparisons, but there will definitely be a difference in technique and style. Your own personal touch will be there, even if it is your first piece.
As I mentioned above, I am the newbie here and am so much learning from my blog friends and others. One of the biggest highlights of my new found love of wire wrapping is the people I have met. It would take too long to mention everyone that has inspired and encouraged me along the way. It is truly amazing. Speaking of amazing, I met and spent the better part of an afternoon chatting with Helen Goga, editor and publisher of The Wire Artist. I met Helen, Becky and Alan, and what a wonderful group of people with a bottomless pit of information. I bought a nice selection of tutorial and plan (as I progress) to try them all! This was an afternoon I will never forget. You know when you meet someone and something just goes “click”, well that happen to me with Helen. I have made a friend and (one that may get sick to death of my questions) but none the less a friend. I once thought of myself as a very introverted person, this new hobby of mine has sure changed that.
Okay girls! 1 2 3 GO! Let’s make some cuffs!!
Last one done buys dinner..??
-Penny
Subscribe to:
Posts (Atom)