
Wednesday, August 4, 2010
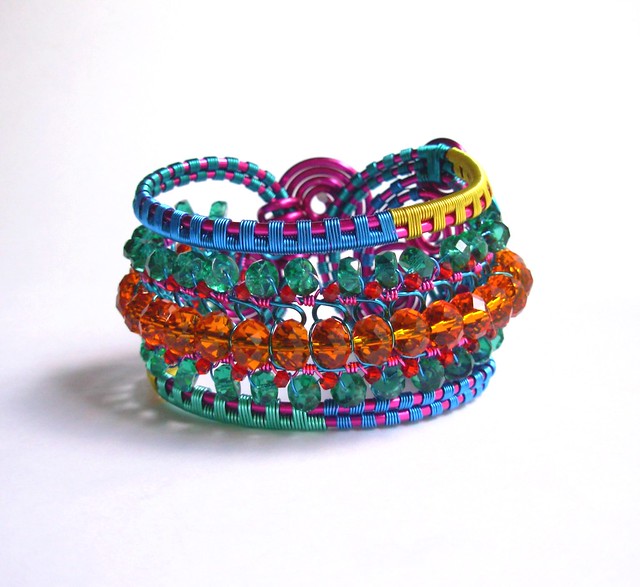
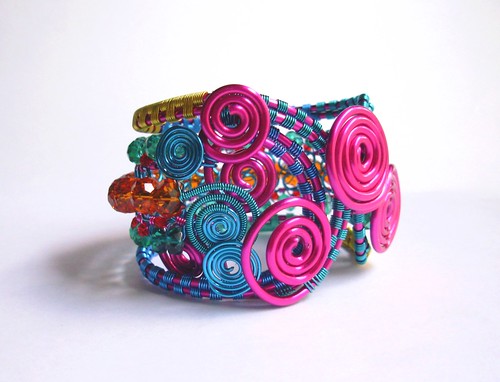
Challenge cuff completed, although future design alterations are in the works
Shaping the challenge cuff

Framing up a cuff
Okay, diagram and focal in hand, I began to frame up the cuff for my challenge today.
The cuff was inspired by Alexander Damian, who used carnelian and copper, a favorite combination of mine. My friend April has been having fun with shrink plastic, bringing back my love for it, so I decided to do one of my miniature colored pencil paintings on shrink plastic as the focal for my cuff design.
Dawn and Penny, who originally started this challenge, have long since finished their cuffs, with me lagging far behind due to the lack of supplies to finish my original design. Time to play catch up!
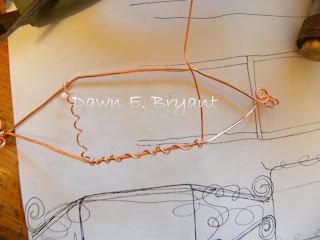 I wanted the cuff to center around the autumn themed focal painting and appear "tendrilly," so I hammered (for strength) 16g copper wire after forming it around the top and bottom of the focal. Then I wrapped 20g copper around it loosely to resemble tendrils.
Now the hard part was to figure out how to hold the focal in the cuff! Next post!
The cuff was inspired by Alexander Damian, who used carnelian and copper, a favorite combination of mine. My friend April has been having fun with shrink plastic, bringing back my love for it, so I decided to do one of my miniature colored pencil paintings on shrink plastic as the focal for my cuff design.
Dawn and Penny, who originally started this challenge, have long since finished their cuffs, with me lagging far behind due to the lack of supplies to finish my original design. Time to play catch up!

Now the hard part was to figure out how to hold the focal in the cuff! Next post!
Cuff Challenge -- a whole new idea -- Alexander and April inspired


I have gotten back into my miniature colored pencil paintings on shrink plastic again, so I have been tearing boxes apart at our new house trying to find the box with the computer discs full of my photos.
I wanted something with warm fall colors in it, and sadly, had lost most of those photos with a computer meltdown a few years back, but I did finally find a suitable photograph. I won a few awards with this photo a few years back, but it has been out of mind since.
So, I did a small painting, baked it to shrink it, then baked it again to soften the edges, intensify the colors and seal the back, plus add shine.
Then I sketched out the bracelet design. I wanted it to incorporate the focal, plus be "tendrilly."
This is the design I came up with, and the focal piece.
Monday, July 26, 2010
It's done day or should I say week three or four


Added some sterling silver beads, more wire, crystal pale pink heart, silver heart, that I banged out of 20 gauge wire. Pulling, twisting to get into shape. Big challenge, huge challenge, loads of mistakes but here it is. I am going to call it My Friendship Bracelet; why, because this bracelet has played a very large part in finding and enjoy a kindred sole.
Saturday, July 24, 2010
Play time!

Tuesday, July 20, 2010
Alexander inspired cuff finished, and nothing like its inspiration!
 Thanks for visiting!-Dawn Blair
Subscribe to:
Posts (Atom)